Video Tutorial
If you prefer video tutorials, this video will walk you through the steps on how to get set up quickly so you can read and write data to your Firebase Database from your browser console.

Text Tutorial
This post will show you how to set up a simple JavaScript program that will allow you to interact with Firebase from the browser console.
Why would you want to do this? You might want to quickly prototype the basic functionality of a program that stores data in the cloud. With just a little bit of setup, you can push data to the cloud directly from your browser console, so you can prototype the basic functionality of your program without having to build any UI.
First, we need to configure a new project in the Firebase console
If you haven’t done this already, here is a step by step guide to creating a new project in Firebase. It’s important that you add a Realtime Database to your project. Instructions to do all of this are in the article.
Set up a new JavaScript project
Create a new folder somewhere on your computer. We’ll call ours firebase-demo.
Inside the folder, create a file called index.html
In index.html, add the html boiler plate, and change the title to Firebase Demo.

Next, create a file called index.js
This is where we’ll set up Firebase in our code.
Here is the code we need in our index.js file:
// Import the functions you need from the SDKs you need
import    from "https://www.gstatic.com/firebasejs/9.6.1/firebase-app.js";
// These are the basic functions we need to get and set data in the database
import {
  getDatabase,
  ref,
  get,
  set,
  child,
} from "https://www.gstatic.com/firebasejs/9.6.1/firebase-database.js";

// Replace this with your config object from your firebase console
// Find yours under Project Settings > General > Your apps > SDK Setup and configuration
const firebaseConfig = {
  apiKey: "your apiKey",
  authDomain: "your authDomain",
  databaseURL: "your databaseURL",
  projectId: "your projectId",
  storageBucket: "your storageBucket",
  messagingSenderId: "your storageBucket",
  appId: "your appId",
};

// Initialize Firebase
const app = initializeApp(firebaseConfig);
const db = getDatabase(app);

// Attach firebase to the window so we can access it from the browser console
window.firebase = {
  getDatabase: getDatabase,
  ref: ref,
  get: get,
  set: set,
  child: child,
};
A few things to note
At the top we’re importing the functions we need from firebase. In our case, we’re only importing the basic functions needed to get and set data from our Realtime Database.
The values in the firebase config object are unique to your project. You can find them under Project Settings > General > Your apps > SDK setup and configuration. You can see instructions on how to find this in this article.
This is the important part: At the bottom, we are attaching our Firebase functions to an object called firebase, which we are attaching to the Window object. This will make our firebase object a global variable, which means we will be able to access it from our browser console.
Attaching our firebase object to the Window object is not the best idea for production applications, but we are only trying to play around and get set up as quickly and easily as possible. This approach lets us do that.
Include our JavaScript file in our HTML file
Now that we have our JavaScript file set up, we need to include it in our HTML file using a script tag. Add a line inside the head tag that looks like this:

Note: we have to include the type=”module” so that we can use import statements at the top of our index.js file (which we use to import the functions we need from the Firebase SDK). If you remove type=”module”, you’ll get an error when you try to run the code.
Serve our website locally
Now we need to serve our website locally so we can interact with it in our browser. We’ll use a wonderfully simple npm package called serve to do this.
Open a terminal window, and from your project directory, run npx serve
You should see output like this:

Open your browser and go to http://localhost:3000
Right click on the page and choose Inspect to open the developer tools.
Click the Console tab in the developer tools panel.
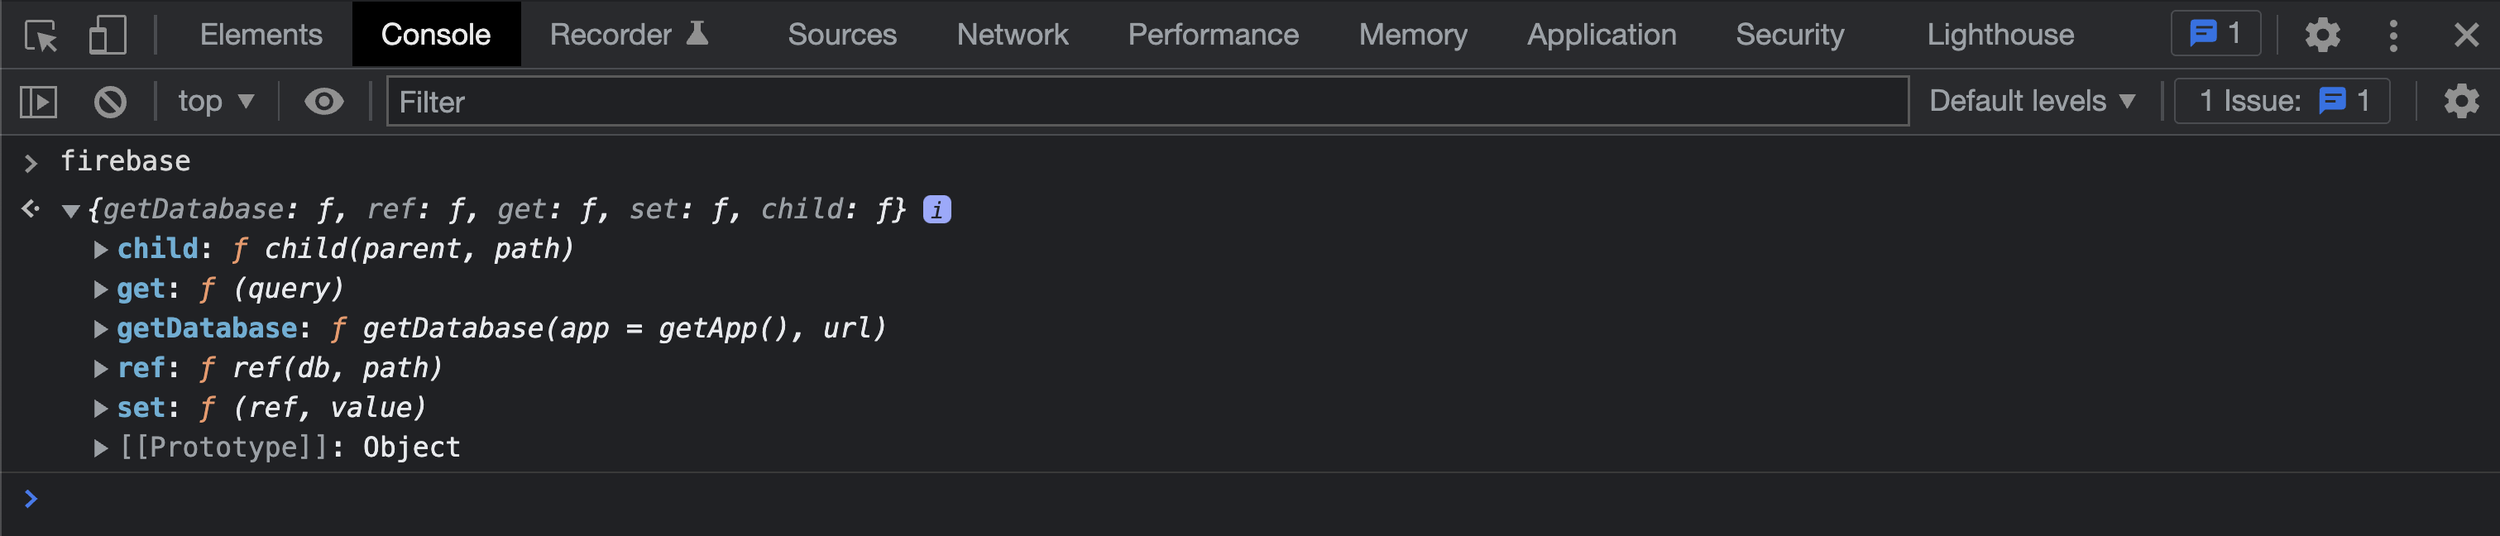
First, let’s check that we have access to our firebase functions.
To do this, type window.firebase and press Enter.
You should see output like this.

And actually since variables on Window are global variables, we don’t have to type window at all. We can simply type firebase to access our object.
Now we can write a function in our console that lets us write user data to our Firebase Realtime Database.
Type this into your browser console, and press enter.
function writeUserData(userId, name) {
  const db = firebase.getDatabase();
  firebase.set(firebase.ref(db, 'users/' + userId), {
    username: name,
  });
}
Your console should look like this:

Now we can use our function like this:

When we call our function like this, we provide two arguments: the userId (1), and the username (“jacob”).
We don’t see any errors, which is good.
Now we can check in our Firebase console, under the Realtime Database tab to confirm that our data made it safely into our database.

There it is! Our data, which we sent directly from our browser console, with no UI necessary.
Reading data from Firebase from the browser console
Ok, so we figured out how to add data to our database. But how can we retrieve that data from our browser console?
Back in our browser console, let’s write this function. Press enter to save it.
async function getUserData(userId) {
  const dbRef = firebase.ref(firebase.getDatabase());

  var user = await firebase.get(firebase.child(dbRef, `users/$`)).then((snapshot) => {
    if (snapshot.exists()) {
      return snapshot.val();
    } else


  });

  return user;
}
It should look something like this in your browser console:

Note that we add async before the function because inside the function we return snapshot.val(), which returns a Promise.
This is necessary since it will take some time to send the request to Firebase, and for our data to be returned.
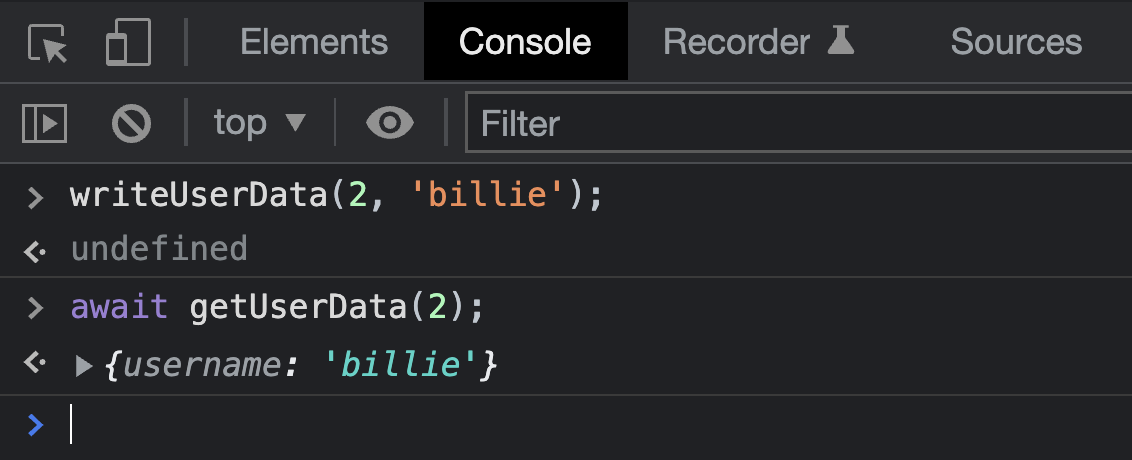
Now we can use our function like this:

Don’t forget to include await before getUserData(1). This tells JavaScript to wait for the Promise to resolve, and to store the resulting value. If you remove await, user will be a Promise, rather than a value when you go to check the value on the next line.
But as long as we have the await there, when we type user into the console, it returns the value that we got from our Firebase database!
Moving our Firebase code into our JavaScript file
So far we’ve found a great way to get up and running with Firebase from the console. But now that we’re set up, we may want to simplify things.
Our strategy so far has been:
In index.js
Import the Firebase functions we need from the Firebase SDK
Attach the Firebase functions to Window
In the browser console
Use those Firebase functions by accessing them on the Window object
Create new functions (getUserData, setUserData) specific to our use case that use these Firebase functions
But now that we know what we want our application code to do (getUserData, and setUserData), we can define those functions in index.js, and attach those functions to Window instead of all the individual Firebase functions (like ref, get, set, child, etc). This simplifies our application’s API.
So our new strategy is:
In index.js
Import the Firebase functions we need from the Firebase SDK
Define our app-specific functions
getUserData
setUserData
Attach those functions to Window
In the browser console
Use getUserData and setUserData directly, without having to define them in the console.
Now that we know our strategy, let’s see how to implement this step by step.
One thing to note: attaching things to the Window object like this isn’t necessarily best practice for production applications, but we’re only interested in getting up and running as quickly as possible. This lets us do that.
In index.js, add our getUserData and setUserData functions. The code should now look like this:
// Import the functions you need from the SDKs you need
import    from "https://www.gstatic.com/firebasejs/9.6.1/firebase-app.js";
import {
  getDatabase,
  ref,
  get,
  set,
  child,
} from "https://www.gstatic.com/firebasejs/9.6.1/firebase-database.js";

const firebaseConfig = {
  apiKey: "your apiKey",
  authDomain: "your authDomain",
  databaseURL: "your databaseURL",
  projectId: "your projectId",
  storageBucket: "your storageBucket",
  messagingSenderId: "your storageBucket",
  appId: "your appId",
};

// Initialize Firebase
const app = initializeApp(firebaseConfig);

// Define our app-specific functions
async function getUserData(userId) {
  const dbRef = ref(getDatabase());

  var user = await get(child(dbRef, `users/$`)).then((snapshot) => {
    if (snapshot.exists()) {
      return snapshot.val();
    } else


  });

  return user;
}

function writeUserData(userId, name) {
  const db = getDatabase();
  set(ref(db, "users/" + userId), {
    username: name,
  });
}

// Attach our app-specific functions to Window so we can use them from the browser console.
window.getUserData = getUserData;
window.writeUserData = writeUserData;
Save the file, and restart the local server to pick up the changes. To restart the local server, go to your terminal and press control + C. Then type npx serve and press enter to start the server again.
Go to your browser (still on http://localhost:3000/) and refresh the page to pick up the changes.
Now, let’s see what has changed.
If we try to access our firebase object like before, we get an error telling us firebase is not defined.
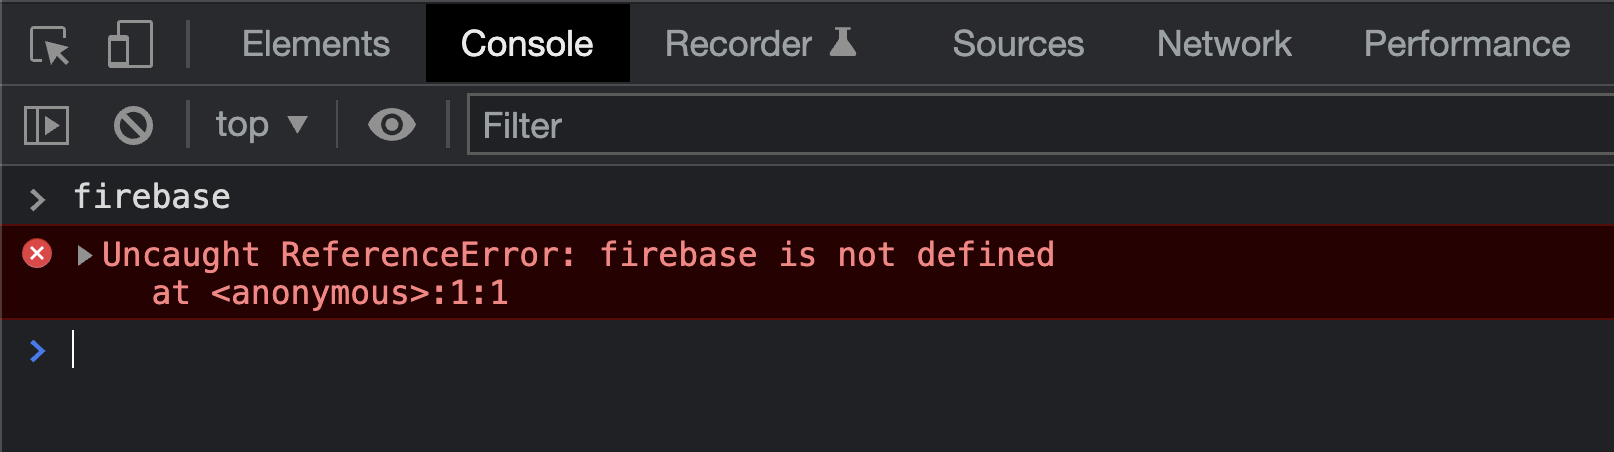
That’s good!
Because now, we’re not using Firebase directly, we’re using our application code. Let’s see how that works.
If we try to access our getUserData function (do this by typing getUserData and pressing enter), the console shows us our function!

Ok, so there’s our function. Let’s use it.
What happens if we run the function on its own?

That kind of works, but it returned this pending Promise. We were hoping for our user object: { username: “jacob” }.
To get this we need to tell JavaScript to await the result of the Promise. So we can add await in front of the function call, and now the console will wait for the promise to resolve, and return the value. Like this:

It works!
Now let’s try to write user data to our database with our writeUserData function.

Not much happens. But no errors, so that’s good.
Let’s check our database in Firebase Console to see if the data made it in there.

There it is! It worked perfectly.
But actually we don’t need to check the Firebase Console at all, because now we have our getUserData function, which we can run directly from our browser console.
There we have it. We were able to write data to our database, and then get that data, all from the comfort of the browser console.
Summary
We wanted a fast and easy way to store data in the cloud.
By attaching firebase functions to the Window object, we could do this from our browser console without having to build any UI.
We then simplified things by moving the firebase code into our index.js file, and instead attaching our app-specific functions (getUserData, setUserData) to the global Window object.
Then we could run our app-specific functions from our browser console to easily store and retrieve data from the cloud.